
Sitting, the new trend?
It is a well-known problem that many people do not move enough and sit too much in their everyday lives.
The DKV (German Health Insurance) reports in its report by 2023, the average respondent will spend more than 9 hours per working day sitting. Over the last seven years, the average sitting time has increased continuously by around 1.5 hours. But what exactly is so unhealthy about sitting?
Most people are aware that sitting not only has a negative effect on the muscles of the human body, but also brings with it a number of other risk factors. The following section will examine muscular shortening.

LET’S TAKE A CLOSER LOOK AT THE DAILY LIFE OF AN OFFICE WORKER:
The alarm clock rings in the morning, after spending most of the night lying on your side, you get up, get ready for the day and have breakfast, usually sitting down. (The hip flexors shorten!)
Then it's off to work: either directly by car, which is waiting outside the door, by bike (here too, the hip flexor is approximated) or you walk to the train and maybe even stand in it. It would be better to walk the whole way, because then the hip flexor is stretched (especially when walking with long strides). After you get to work, you go to your desk. Fortunately, most offices now have standing desks so that you don't have to sit all day. Our person now sits at the desk until lunchtime, often crossing his legs and after a few hours he slouches in the chair rather than sitting, and his head also moves ever closer to the screen.
After lunch has been eaten sitting down, the work continues sitting at the desk until the end of the day. The only change at lunchtime is going to the canteen, the toilet, the copier, etc. In the evening, it's time to do some exercise to compensate. After dinner, eaten sitting down, the evening ends in a relaxed manner on the couch (and the hip flexors are shortened again).
Are we actually aware of how often and how much we sit?
How would our body feel after a day like that?
Would it be easy for us to get up and go for a walk after several hours at our desk? Or do we need some time to stretch first? And why is stretching so good after sitting for a long time?
HIP FLEXORS
Our hip flexor, also known as the iliopsoas muscle, is the general term for three muscles: the large hip flexor, the psoas major, the small hip flexor, the psoas minor, and the iliacus muscle, also known as the iliacus muscle. The name already explains what exactly this muscle does: it is responsible for flexing the hip. This means that whenever we sit, whether on a kitchen or desk chair, on a horse or bicycle, or in a car, this muscle is in its comfort zone. If we now want to stand up straight, stretch or walk with long strides, this muscle is lengthened.
After sitting for a long time, we go from the comfort zone of this muscle into extension, which is exactly the opposite of the comfort zone. The muscle must allow length. If it cannot do this, perhaps because it is already shortened, it will be very difficult for us to get into an upright position and extend the hip.

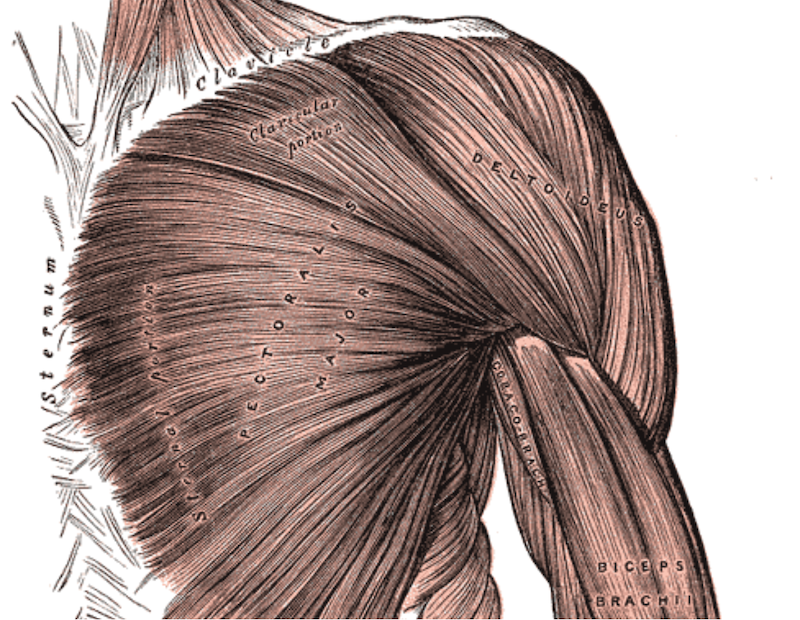
chest muscles
We do most of our work in front of our bodies, whether we are writing something, putting things away on shelves, massaging people, caring for them, etc. As a result, the chest muscles tend to shorten over time. Maybe we find it difficult to circle our shoulders back and bring our shoulder blades together after a long period of leaning forward. Do you find it difficult?
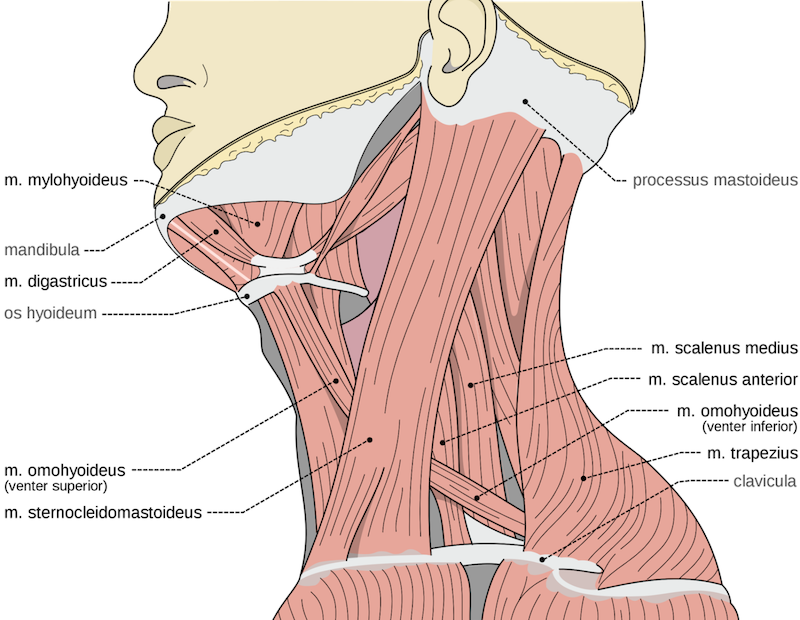
NECK AND NECK MUSCULATURE
How does the neck and throat area feel after a long period of computer work or leaning forward? Do we find it easy to turn and move our heads around after staying in one position for a long time? Or do the movements feel a bit stiff at first? Is our head aligned above our body, or does it move further and further in front of the monitor over the course of the day? Are we in a straight and upright position, or is our workplace perhaps set up in such a way that we constantly have to tilt our heads to one side?
LATERAL FLANK
The lateral flank muscles also shorten when sitting on one side. If we sit crookedly, one side is shortened and the other is lengthened. That's why we should always alternate, but how often do we do that? Most of the time we sit in our favorite position. Watch yourself and see if you are sitting straight and upright, or if one side is shortened? And if so, alternate as often as possible.
WHAT CAN WE DO PREVENTIVELY TO PREVENT SHORTAGES AND TENSION FROM HAPPENING IN THE FIRST PLACE?
✓ Get up at work as often as possible and walk a few steps
✓ Use breaks for exercise
✓ Set a timer, e.g. on your mobile phone, that reminds you to get up or do an exercise every 30 minutes at the latest (exercises follow)
✓ Many smartwatches allow you to set the intervals at which you want to be reminded to get up
✓ Regularly use the standing function of the desk (if available)
✓ Regularly change your sitting position and head posture
✓ Stick a note on your desk saying: "Put your chin in!" or "Make a double chin!" (exercises follow)
WHAT IS MUSCLE LENGTH TRAINING?
During muscle length training, the muscle works in length, which means that in an exercise the muscles are first lengthened (like stretching) and then actively worked. This kills two birds with one stone: the muscle is lengthened, which counteracts the shortening in everyday life and at the same time trains it. What exactly this looks like becomes clearer during the exercises.
It is important to differentiate between pure strength training and pure stretching. Muscle length training combines the two. With regular practice, the muscles not only grow in length, but also in strength. In addition, not only does one muscle work in isolation, but the entire muscle chain is active, e.g. when doing a standing backbend from head to toe and vice versa.
The entire front of the body works while the back is relaxed. This makes the exercise even more functional, because in everyday life it is rare that only one muscle performs a movement; usually several muscle groups are involved at the same time.
The purpose of muscle length training is to increase muscle mass, not in terms of muscle size as with classic strength training, but in terms of length, because the smallest units of the muscles, the actin and myosin filaments, should not be arranged on top of each other, but one behind the other in series, i.e. in length. ( Source ) You can also ideally combine muscle length training with the EMS systems from eaglefit: PRO EMS system
LET’S GET TO THE EXERCISES:
The following exercises can be easily carried out at work. Apart from a band, no other equipment or tools are required.
The general rule for all exercises is: never practice when you are in pain, always listen to your body's signals and do not exert too much force. The exercises should not be performed if you are in acute pain, injured or ill. The hip flexor exercise should also not be performed if you have a rectus diastasis, are pregnant or have an abdominal, inguinal and/or umbilical hernia.
Duration of the hold : The muscles may tremble slightly and also work. If you feel strained, breathe deeply 3-5 times, then slowly release the exercise. The exercise should not be ended abruptly, but rather come out slowly and in a controlled manner. If you experience pain during the exercise, stop slowly and check whether the exercise was carried out correctly. It is important never to practice until you are in pain or to exceed a limit. After completing the exercise, gently loosen the muscles again: move, e.g. circle your shoulders and walk a few steps.
GENERAL HOLDING PERIOD FOR THE FOLLOWING EXERCISES:
A bit of body awareness is required: the exercises may be a little strenuous for the muscles, which may even tremble slightly, but you should not exceed your limits and never exercise into pain.
Then, when the exercise starts to get difficult, take another 3-5 deep breaths and then slowly come out. Avoid ending the exercise abruptly; always come out slowly and in a controlled manner. After the exercise, relax the muscles, walk a few steps, circle your shoulders, etc. If you experience pain or discomfort during an exercise, stop it and relax the muscles again, walk, circle your shoulders, etc.
Tip:
Most of the exercises can be done not only at work, but also on the go. For example, you could simply lean backwards while waiting in a long line or do a neck exercise while sitting on the train. There are no limits to creativity!
THE EXERCISES FOR YOUR MOBILITY TRAINING
EXERCISE FOR THE HIP FLEXORS
(EMS: Settings / Mobility / activate front chain; PRO EMS system )
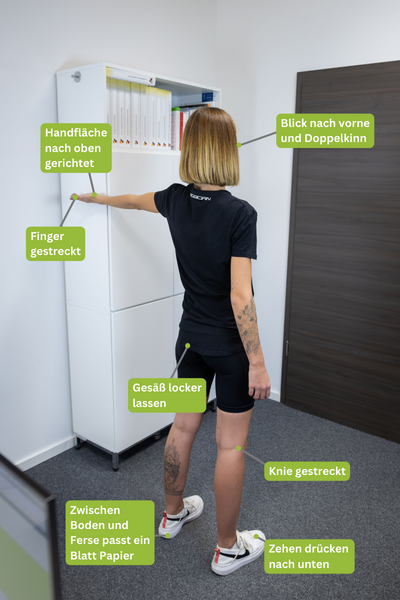
- Stand loosely in front of the desk, in front of a wall, shelf, etc.
- If possible in flat shoes (without heels), socks or barefoot
- Distribute weight equally on both legs
- Shift the center of gravity to the toes, which press down into the shoe or the ground
- The heels do not actively lift upwards, only the shifting of weight causes them to be slightly raised so that a sheet of paper would fit between them
- Stretch your knees loosely
- Push the pelvis as far as possible over the feet
- Imagination: there is an imaginary thread on the pelvis, which pulls it forward
- The upper body moves slightly backwards to compensate
- The shoulders do not pull up to the ears, but remain relaxed
- The arms hang loosely
- The chin sinks slightly towards the breastbone, making a double chin
- The back of the body, especially the buttocks, should remain relaxed
A notice:
You can also do the exercise standing in the doorway. The advantage is that you have better support if you lose your balance. Alternatively, you can also gently hold onto the table top, which provides additional security.

Differentiation exercise for hollow back:
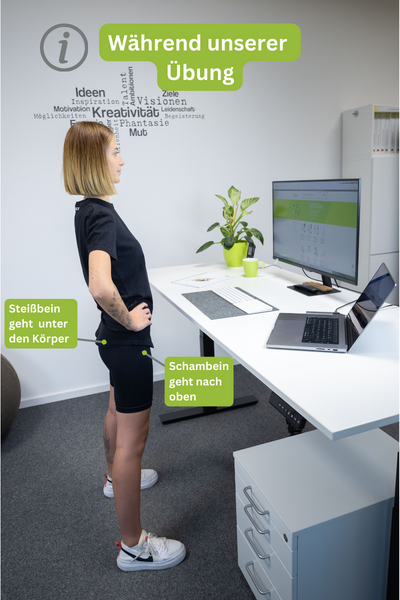
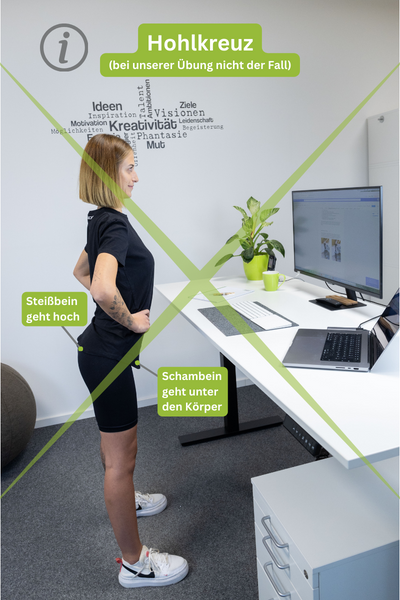
During this exercise, you might suspect that you are arching your back. But the exact opposite is the case. As the pictures show, when you arch your back, the pubic bone sinks under your body and the coccyx rises. But in this exercise, the coccyx sinks under your body and the pubic bone rises, which is the exact opposite of arching your back.
EXERCISE FOR THE LATERAL FLANK MUSCULATURE WITHOUT BAND
- Standing sideways in the doorframe or under an open staircase
- The left side is practiced
- The left hand presses the edge of the little finger against the door frame or a stair step
- The back of the left hand faces backwards, the palm forwards
- Push the left flank as far to the left as possible over the hip without moving the upper body to twist
- The body weight shifts to the outer left leg, it remains stretched
- The right leg can bend
- Tilt your left flank to the side like a banana
- The head is in extension of the spine (tilts slightly)
- The view is directed forward
- The chin sinks slightly towards the breastbone, making a double chin
- Then change the page

EXERCISE FOR THE LATERAL FLANK MUSCULATURE WITH BAND
- Attach the tape to a window handle or alternatively to the door handle so that it cannot slip off
- Stand with the right side of the body sideways to the attachment
- The left hand loosely grasps the band (in the loop)
- Stretch the left arm above the head with an incline to the right
- There is only a slight tension on the tape
- Do not hang on the tape (if someone were to cut the tape, you would not be allowed to fall over)
- The elbow is slightly bent
- The back of the hand faces backwards, the palm faces forwards
- Apply pressure upwards into the band with the edge of the little finger
- Use this pressure to open the left flank and push yourself out with the left side of your body over the left leg
- The left leg remains stretched and the right leg can be bent
- Tilt your head slightly in line with your spine
- The view is directed forward
- The chin sinks slightly towards the breastbone, making a double chin
- To finish the exercise, slowly walk towards the band attachment and let the arm sink again
- Then change the page

EXERCISE FOR THE CHEST MUSCLES WITHOUT A BAND
(EMS: Settings / Mobility / activate front chain)
- Loosely standing on the side of the door frame or on the side of a shelf
- The left side is practiced
- The left arm is stretched (the elbow remains stretched during the exercise)
- The hand is positioned so that the palm is facing upwards and the thumb is pointing backwards (easier version with thumb facing upwards and palm against the wall)
- Imagine: on the palm of your hand there would be a tray with glasses that must not fall down
- The edge of the little finger presses into the door frame or against the shelf
- The shoulder remains low and does not pull up to the ear
- gaze is directed forward
- The chin sinks slightly towards the breastbone, making a double chin
- All arm heights from low to high can be practiced
- Repeat the exercise with the other side
A notice:
If you feel a tingling sensation in your fingers, hands or arms during the exercise, stop/pause the exercise and choose a different arm height later. All arm heights from low to high can be practiced.
EXERCISE FOR THE CHEST MUSCLES WITH BAND
(EMS: Settings / Mobility / activate front chain)
- Attach the tape to the window handle or alternatively to the door handle so that it cannot slip off
- Both sides are practiced simultaneously
- Stand with your back to the band attachment
- Hold the band loosely in both hands (hands go into both loops)
- Run forward a little until the band is slightly taut
- The thumbs point backwards and the palms point upwards (for the easier version, the thumbs point upwards and the palms point forwards)
- The toes press into the ground, as in the exercise for the hip flexors
- Shift your weight slightly onto your toes so that your heels become a little light without actively lifting them
- Stretch your knees loosely
- The pelvis may move slightly forward over the feet (but not as far as in the exercise for the hip flexors)
- The chin sinks slightly towards the breastbone, making a double chin
- Imagine: on the palms of each hand there would be a tray with glasses that must not fall down
- The shoulders do not pull up to the ears
- Imagination: push an imaginary wall forward with the edges of your little fingers without the band or your arms actually moving forward
- The elbows are stretched and remain stretched during the exercise
- To finish the exercise, slowly lower your arms and walk back to the anchor
A notice:
If you feel a tingling sensation in your fingers, hands or arms during the exercise, stop/pause the exercise and choose a different arm height later. All arm heights from low to high can be practiced.

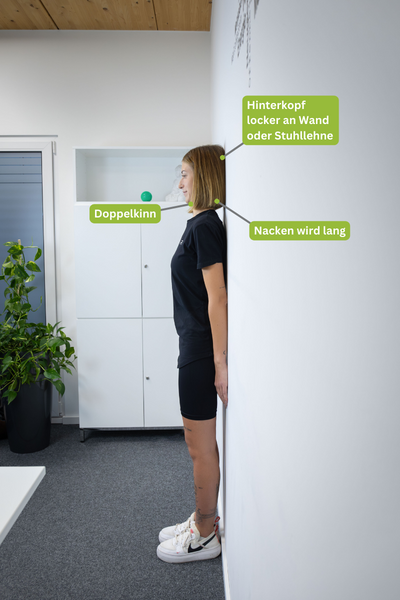
EXERCISE FOR THE FRONT NECK MUSCLES
(EMS: Settings / Mobility / activate front chain)
- Standing loosely against a wall
- The back and heels touch the wall if possible
- The back of the head rests loosely against the wall (it remains against the wall throughout the entire exercise)
- Move the chin as far as possible towards the breastbone with the back of the head leaning back
- Making a double chin
alternatively:
- Sitting loosely on a chair with a headrest or car seat
- The back of the head is leaning (and remains leaning during the exercise)
- Move the chin as far as possible towards the breastbone with the back of the head leaning back
- Making a double chin
This exercise is primarily a perception exercise; in this position the head should be in the optimal position in everyday life, namely above the body.
How often does he wander to the front of the PC in his daily life?
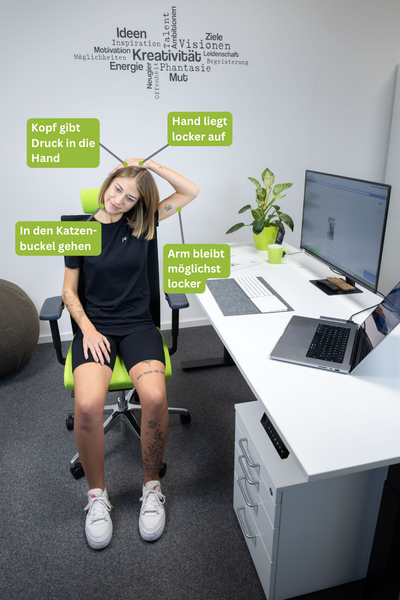
EXERCISE FOR THE NECK MUSCULATURE
(EMS: Settings / Mobility / activate rear chain)
- Sitting loosely in the chair, leaning if possible, alternatively sitting freely, feet loosely placed
- Let the chin sink as far as possible towards the sternum
- The front neck muscles should not tense up
- The shoulders do not pull up to the ears
- Now the hands come into play: it is important that they do not pull on the head, but are simply placed loosely on the back of the head, they weigh the head down a little with their own weight
- The hands can either be clasped or only the fingertips can be placed
- Now the back of the head gives a light and constant pressure against the hands backwards and upwards
- The hands only hold against and do not pull on the head
- A “cat’s hump” in the area of the back of the neck may occur
- The hands only prevent the head from straightening up again while he applies the light pressure
- The back neck muscles become longer and at the same time more active
A notice:
The hands should not pull or tug on the head and the pressure on the back of the head should be gentle and moderate. If you experience pain or dizziness during the exercise, stop it and do not perform it if you have acute pain or discomfort in the neck area.

EXERCISE FOR THE LATERAL NECK MUSCULATURE
- Sitting loosely in the chair, leaning if possible, alternatively sitting freely, feet loosely placed
- The chin sinks slightly towards the breastbone, creating a double chin (not as far down as in the previous exercise)
- The left ear tilts as far as possible towards the left shoulder
- The left hand grasps the right side of the head, orienting itself towards the ear
- Important: the hand does not pull on the head, but only holds against the gentle pressure of the head
- The right side of the head gives a light and constant pressure against the hand
- The hand prevents the head from rising again while gently pressing
- A “cat’s hump” may appear on the right side of the neck
- The right side of the neck and neck lengthens and at the same time increases activity
- Repeat the exercise with the other side
A notice:
The hands should not pull or tug on the head and the pressure on the head should be gentle and moderate. If you experience pain or dizziness during the exercise, stop it and do not perform it if you have acute pain or discomfort in the neck or throat area.